PART ONE – THE CHALLENGES
There are two challenges to choose from in this assignment. One being to enter the Los Angeles Music Video Festival 2018 where you have to create a suitable music video for a piece of music. The other option is entering the London Experimental Film Festival. Creating an experimental film is required for this task.
I chose to create a music video for this assignment which mean I’ll be submitting to the LAMVF is a film festival.
PART TWO – INSPIRATION
Above I have put my Mood Reel. This is a video that I have made which has clips of footage that I thought resembles my idea and creates my mood. I try and tell the story that I want to create through used clips of films as I visual to see if my idea will work.
The music that I have chosen for my mood reel, is a rap cover of an xxxtentacion song called Jocelyn Flores which has a very slow and sad tune to it with contrasting beat and fast lyrics. I chose this song as I thought I would fit my idea best as well as connecting with an audience.
I choose a car crash to start my mood real as I thought that, that scene especially showed a great contrast between happiness and sadness and quick they can change. I added this because this is the feeling I want to re-create in my music video although I want to use the music as well to help relate to the audiences.
The second clip is an ambulance scene I used this to help piece together a story in my mood real, as well as showing the heart break over death.
In my third scene it shows shots of a funeral of a son who just lost his Dad, and I feel like that scene captures the mixed emotions that people go through when someone dies. I also tired out a blue colour grade to see if it worked on that setting and mood.
I then played a scene from Sherlock as Wattson greaves for the death of his friend, I wanted to add this as I will be filming a scene at a graveyard and I thought I could use that clip as inspiration to. come up with something like it.
I then used a clip from fight club when one of the actors goes to many support meetings and gets to let loose some his built up anger and sadness, showing that people deal with sadness in many different ways which I want to show in my music video.
I then used drug taking scenes from Iron Man and Pulp Fiction to show the contrasted way of dealing with a struggle the darker way.
TEST SHOTS
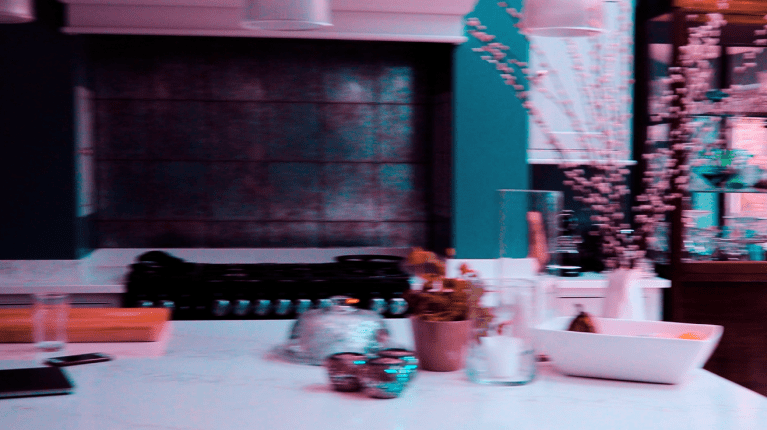
In this test I was practicing some camera skills as well as editing. I was trying to create a cinematic travel video feel in college unfortunately the weather wasn’t great for a travel video but this gave me a chance to experiment with colour grading.
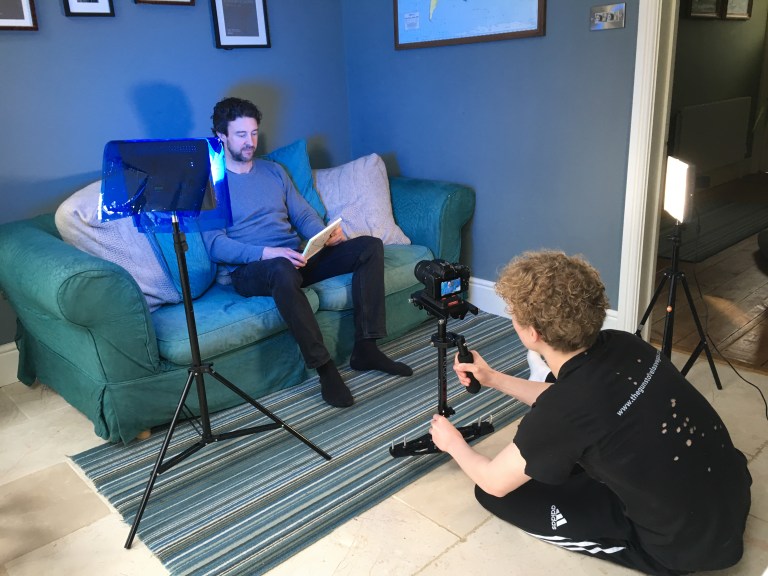
In this test shot I wanted to practice my camera work with a stabiliser as I needed a lot of practice before filming the real thing. This was also a good time to see what camera angles and shot types would work in this setting and how well they looked when edited.
This test shot was to test the idea of using the luma in my visuals project as a transition into a memory, I think the effect worked really because it can dissolve the faces on picture but leaving a bit of background allowing for a more immersive feel. The practice shot was really helpful in the fact that it gave me a chance to practice this transition and ready for when I edit the real music video.
PART THREE – UNDERSTANDING THE CHALLENGES
WHAT IS THE LOS ANGELES MUSIC VIDEO FESTIVAL?
The Los Angeles Music Video Festival is a festival solely designed for the showcase of music videos which began in 1995. . The festival has seven different categories for each music video to fall into. These consist of:
- Narrative
- Non-Narrative
- Animated
- Student
- Unofficial
- Interactive (New)
- Annual Bonus Category: Performances, Industry, Experts, Workshops, Awards, Networking
Professional judges critique the music videos which were submitted into the competition. The competitors which succeed then have the ability to win prizes and rewards for their efforts.
As it is the seventh year in which the festival has taken place, it has its eyes on becoming “the premier American music video festival” which will be able to bring independent musicians and filmmakers together.
PRIZES AND AWARDS OF THE FESTIVAL
We award our famous “EMVY” trophy – a bronze-dipped VHS Tape – for each of the following categories:
Best Narrative Music Video
Best Non-Narrative Music Video
Best Animated Music Video
Best Student Music Video
Best Unofficial Music Video
Best Interactive and/or VR Music Video
In addition, sponsored prizes in the past have included premium speakers from SONOS, hard drives, editing and SFX packages, production resources and one-on-one meetings with the top record label and directors’ reps.
RULES OF THE FESTIVAL
GENERAL RULES:
- Entries must reasonably represent the music video genre—short films and experimental films need not apply.
* Music Videos must have been completed on or after October 1, 2017.
- Music videos should be between 2 and 5 minutes in length. However, videos up to 10 minutes long will still be considered.
Music videos must be available for screening at the festival, on August 3, 2018
LAMVF reserves the right to change submission categories and prizes at their discretion.
- LAMVF does not guarantee submitted music videos will be selected for the festival.
* Filmmakers and musicians entering videos into the festival must possess the legal rights to submit AND screen their work. The LAMVF is not responsible for clearing publishing, performance or other rights for the music videos it reviews, screens, showcases on its site or otherwise utilizes for festival publicity.
* We currently do not accept hard-copies. If you would like to submit your
film as a link from a site such as YouTube or Vimeo, or a secure FTP or
Dropbox site, please send an email to *info@lamvf.com* with the subject
line “*Submission Link”* and your Submission code. Please provide clear
username and/or password instructions, as well as any other relevant
instructions. Please do not send your film as an email attachment.
* NEW REQUIREMENT: Please include type of camera and editing software used. It will influence future prizes!
TERMS AND CONDITIONS:
By registering for this festival, I hereby grant the LAMVF the standard non-exclusive rights that would be granted to a music video broadcaster, as well as the right to make videos available on the LAMVF’s website, and to make dub masters available to broadcasters for promotional purposes.
The LAMVF does not guarantee in any way that the submitted video will be selected for the festival or used for promotional purposes. This decision is at the discretion of the LAMVF.
The LAMVF may archive selected videos on a master format for archival purposes. The LAMVF may also screen selected videos at partner festivals and events. However, the LAMVF is not responsible for returning or preserving videos submitted.
Music Video – Understanding Music Videos
Music Video
- they have hidden meanings
- they can be reflective of the artist or the song
- narrative styles
- non-narrative styles
- way to make extra money
- commissioned by a record label – not much creative freedom
- need to recognise the genre of the music
- budget
- ads / product placement
In oder to make a successful music video you must be able to analyse existing music videos to understand their meaning
- semiotics (sings and symbols)
- code and convention – a way of recognising a genre
Music Video styles
Lyrics interpretation:
when you talk the lyrics of the song and produce a music video which represents your interpretation of the lyrics an example of this would be Taylor Swift with her songs talking about a Romeo and Juliet style and the video reflecting that.
Extending or consolidating songs meaning:
When you consider the lyrics and create imagery or a narrative to reinforce/ consolidate the meaning of the artist song.
Allusion (or intertextual references):
When the music video makes links / references to artist movements and styles e.g. pop artists. A good example of this is Lady Gaga uses a lot of intertextual references to make her self contravential and stand out more
Links to other artists:
When the music video makes reference to other performers or music artist. Not to be mistaken with Intertextual References which links to art and artistic movements.
Analysing Music Videos
Semiotics – Roland Barthes:
Barthes researched how audiences interpret what they see, looking for signs within a narrative. Within semiotics, anything is used for human communication is considered a sign, gestures, facial expressions, films, music videos.
Sign
↑
How we interpret the combination of the signifier and the signified
Semiology
The relationship between the object and the meaning
↑ ↑
Signifier – The object Signified – The meaning
The signifier (detonation) is perceived as resembling the signified (connotations)
Detonation – Detonation is rapid and uncontrolled combustion, especially in the cylinder of a spark ignition engine which is operating with a fuel with inadequate octane. Combustion chamber contours can be blended slightly to reduce the tendency to detonation.
Connotations – An idea or feeling which a word invokes for a person in addition to its literal or primary meaning.
Heart
Denotations: Pump, Blood, Organ, Body
Connotation: Love, Feelings, Red, Romance
Interpretation of Music Videos (Sia – Elastic Heart)
Sia never features in her music videos she has an actor to play her.
In the video Sia is portrayed as a professional dance with her her so audiences know its her. Throughout the video there are strong themes of escape, the music video does this by using props such as a large cage that has entrapped the dancers.
Some people’s view the music video as an animalistic c of the binary opposite thoughts inside Sia’s mind showing the struggle between conflict and relationships. They get this idea from the abstract dancing shown one the video depicting fights and violence between the two characters, but then switching to love and care clearly tormented between the two thoughts.
Other people think that the music video shows subconscious thoughts trapped in a cage unable to break away from each other but also hostile towards each other.
There are many different interpretations of this music video Sia explained that the two dancers represented “warring Sia self states,” but she apologised on Twitter to anyone who was upset by the video. “All I can say is Maddie and Shia are two of the only actors I felt could play, these two warring Sia self states. I apologise to those who feel triggered by Elastic Heart”.
The fact that there are so many different opinions about video show how effective Sia able interact and connect them, which enables them to have their own interpretations of the video making it feel more personal to them.
Inspiration for Music Video (Bmike – Anxiety)
Mike B is a London singer, songwriter, rapper, and producer he had an emotionally hurtful event in his life, which led him to write his feelings down, creating them into lyrics, and producing his first song the same night. From then on he started writing about his life changing moments humour and freestyles to start his music career.
In this video Bmike expresses his feeling through the song with music video adding the immersion. I think the music video works really well with song as it shows how the rapper feels alone with no one to understand him and his opinions of the people around him.
The mise-en-scene of the music video has a constant theme of dark colours by using grey paint on the walls and sofas, with very bland and darker clothing to reflect the mood of the song being played. The video uses low key lighting to create shadows on the rappers face, however contrasting this look by using brighter high key lighting on the therapists showing how they are opposites to each other. This can also be said for the clothes the actors are wearing Bmike is wearing black to shown his feelings and thoughts whereas the therapist is wearing white clothing to them as binary opposites.
The camera work of this video is very clever as it is constantly moving to show the flow of the conversation and starts to heavy sway when the rapper loses control showing his emotion.
The editing on this video is fast paced cutting to beat to make the transitions to look a lot smoother and seamless. The editing on the music video uses the beat to use pulsing effects and zoom in cuts. The fast cuts to the beat build the suspense in the video as they get faster as the song gets faster and more emotional.
2015 Los Angeles Music Video Festival Winners
BEST UNOFFICIAL VIDEO
The narrative of this video is that there’s a female boxer that keeps having flashbacks whilst she’s in a sparring session to her traumatic childhood as she and her Mum suffers from abuse from her Farther, and how deals and overcomes this inner pain she’s having. The music video tells the story to show how the character channels her pain through boxing and turns it into something positive.
For the miseducating-en-scene the actor are wearing very dark clothing at the beginning of the video as this could reflect how the characters mind in a dark place, as well as that the room is very dark painted completely black reinforcing that the darkness is a reflection of herself. Also the music video uses a lot of low-key light creating lots of shadows making for a more cinematic shot but also symbolising that the scene is very serious and intense.
The camera work. is extremely cinematic as there is constant movement and stabilisation making the video flow a lot nicer and creating a more immersive feeling as the viewer actually theres in the ring with them. The camera is often moving with a fast paced feeling and mimicking the protagonists movements especially in the beginning of the music video, this could be due to the fact that the creates wanted viewers to connect more with the character and feel moved by the story.
To match the fast paced camerawork the editing is fast but often changing pace to match the flow of the song showing lots of slow motion scenes, many of the slow motion shots are used to emphasise conflict by slowing the clip down to make the viewer pay extra attention to what’s happening in that particular scene.
My Visuals Idea
My idea is create a cinematic music using the song ‘Merkules – Jocelyn Flores Remix’. The song uses very dark and depressing lyrics that explain the anxiety and depression of the rapper. They’re common themes of no escape and isolation as Merkules can’t get away from his emotions as the trap him and how no one understands nor can they help him.
My video take his lyrics and partner them with visuals the stick to the themes and feelings of the song, but showing it through too different characters as they both battle there depression coping with it in contrasting ways on. One character is being supported by friends and family using high key lighting to show this and the other character is very isolated and alone using low key lighting to show this.
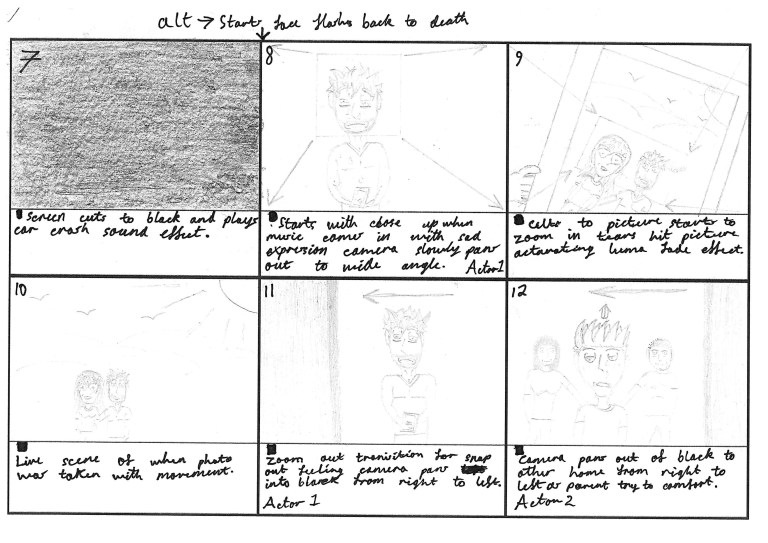
The video starts off with only the beat of the song playing, scene opens to a couple inside of a car talking about there evening enjoying themselves the women is on her phone whilst the man is driving, there’s another couple walking down a the same road that the car is driving on. The girl in the car distracts the driver by showing him a text on her phone he looks down not focusing on the road, the car speeds up to the couple on the road. The beat stops as it cuts to black playing a car crash sound effect. Song starts playing as it cuts to the driver (Actor 1) of the car sat on a sofa crying, holding a photo of him and his partner as his tears hit the photo the scene transforms into the memory of the photo. Scene cuts back to Actor 1 on the sofa as camera slides to the left into black, camera slides out of black into Actor 2 house as his parents try comfort him. Actor 2 stands up frustrated walking out camera following him into black, camera comes out of black into Actor 1 house as him walks out a door. Actor 1 frantically looking for some Vodka and he starts drinking it, cuts too next scene were Actor 1 is taking drugs he looks around the room that’s warps around him Actor 1 head falls back to look up at ceiling and the camera does the same flicking up. Camera flicks down to see Actor 2 standing at the grave of his partner placing flowers on her grave and clearly mourning then walks away. But as Actor 2 leaves he walks into Actor 1 camera flicks between there faces then fades to black.
Merkules – Jocelyn Flores Remix Lyrics
Caught in this head trip, the dark is depressin, lost in the essence caused by the tension
I tried to walk away but they blockin’ the exits
Is this all just a lesson? Prolly not, I put this gun to my head, let me call the shots
I’m all alone, pissed drunk, drinkin’ wobbly pops, am I lookin’ for attention? Hardly stop
But I don’t know ’till I get some. Bacardi and Coke, that’s redrum
Oh, you think I got it made, now, guess what? Look me in my face, motherfucker, I been fed up
But you thought I looked happy…Huh, holy fuck
Well, it’s all your fault ’cause I guess you ain’t ever looked close enough, but let’s get off that, though
Please let me explain, before you tell me I’m sane
Like there’s nothin’ goin’ on when there’s something really wrong and you let it slip away
This isn’t just a part time thing, this is every single day, this depression in my veins, so don’t tell me It’s okay, I’m goin’ mental like a slave, and I can’t ever get a say, and it’s messin’ with my brain
They told me “Calm down, you need to breathe deeper”
Cole, it’s just anxiety, you’re not gonna die, can I please teach ‘ya?
See, what I got here is pills, Ativan and Xanax, and if you take one of each, you can hide all your problems, you can’t stress
So I’m like.. “word”
I think I heard of these, though
‘Cause every single rapper I know just does it for fun
When I need those
Every single night I’m in a cold sweat
Is it heart attack or stroke? I don’t know yet
And then I’m overthinkin’ every old text
And then I show up at the hospital, it’s Cole again
They don’t even take me serious, I’ve been goin’ crazy, period
It’s like I’m in the state of delirium, and y’all can’t even see it
And it makes me furious
But that’s fine, though, y’all can keep your eyes closed
And I’ll consider takin’ those pills that you gave me all at once
On the ride home
The only reason that I won’t, is for my girl and my family
And my fans that’ll hear this shit and get goose bumps, they understand me
Yeah
It’s anxiety
I’ve been goin’ crazy and I’ve been feelin’ down
What the fuck is wrong with me? My time is runnin’ out
Everybody else just lives they life so care free, I blame it on the world, but now it might just be me
I said it might just be me
I’ve been goin’ crazy and it might just be me
I’ve been feelin’ down and tho it might just be me
What the fuck is wrong with me? It might just be me
It might just be me
I take a look around and now it might just be me
It might just be me
I look around and now it might just be me
I’ve been goin’ crazy and I’ve been feelin’ down
What the fuck is wrong with me? My time is runnin’ out
Everybody else just lives they life so care free, I blame it on the world, but now it might just be me
Yeah, it might just be me
I’ve been goin’ crazy and it might just be me
I’ve been feelin’ down and now it might just be me
What the fuck is wrong with me? It might just be me
It might just be me
I take a look around and now it might just be me
It might just be me
It might just be me
Cinematic Film Techniques
Frame Rate
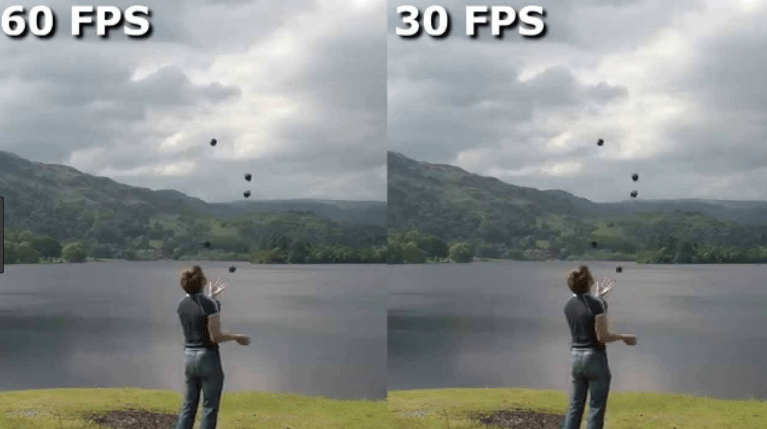
A large majority of feature films are shot in 24fps this has become the standard for years, this is very important when making cinematic films.
ISO

The ISO number show how sensitive the camera sensor is too light, choosing the ISO depends on the lighting of the scene.
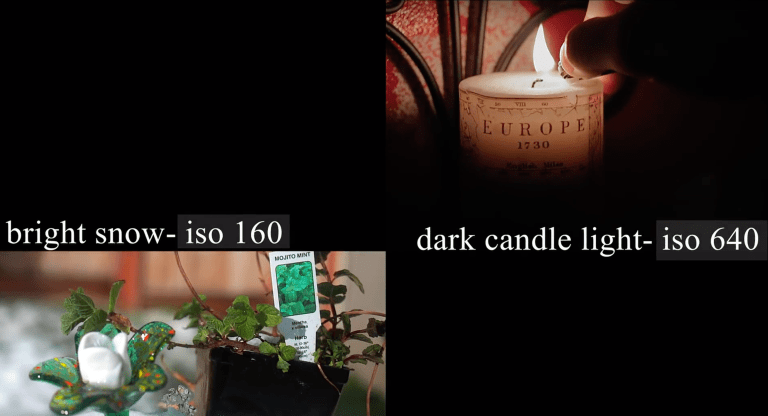
Usually higher ISO is used for darker environment for example candlelight (640), lower ISO is used for brighter conditions such as snow or bright daylight (160).
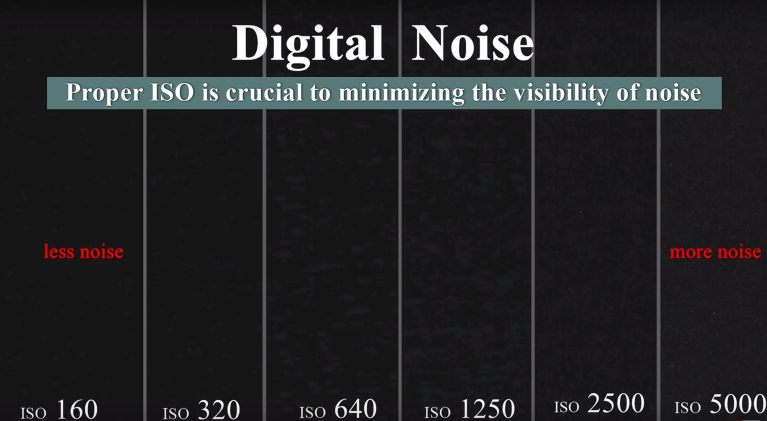
However in higher ISO the footage can needing to reduce the ISO to maintain the highest image quality.
Shutter Speed
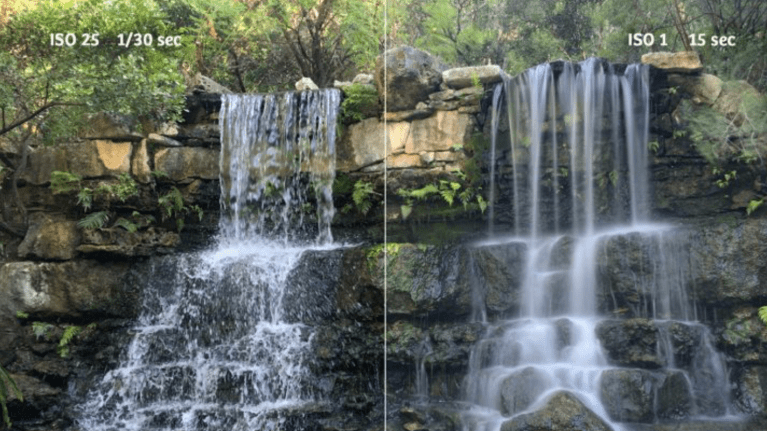
The shutter speed of the camera should be double the frame rate when filming. Setting the shutter to 1/48 or 1/50 of a second can make footage more cinematic by creating natural motion blur.
The shutter also determines how much light hits the camera sensor the higher the shutter speed creates a darker, the lower shutter speed makes lighter footage.
Aperture – F/Stop

Aperture controls the amount of light entering the camera as well as the depth of field. F/Stop represents the size of the apertures opening. Depth of field determines which areas are in focus.
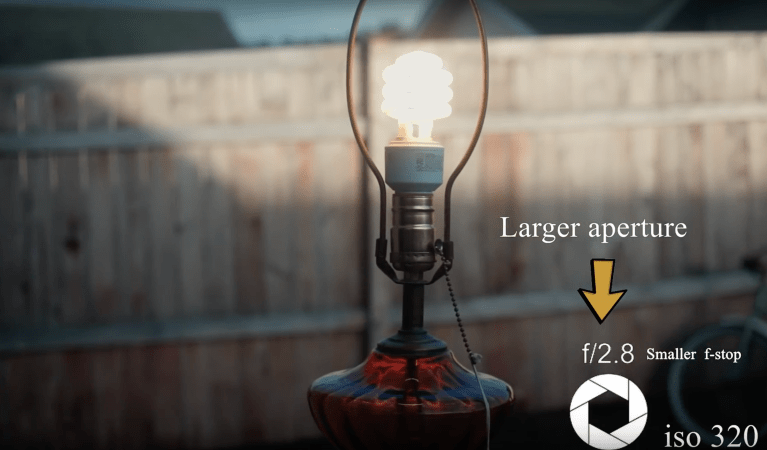
A large aperture creates a shallow depth of field making the background blurry.
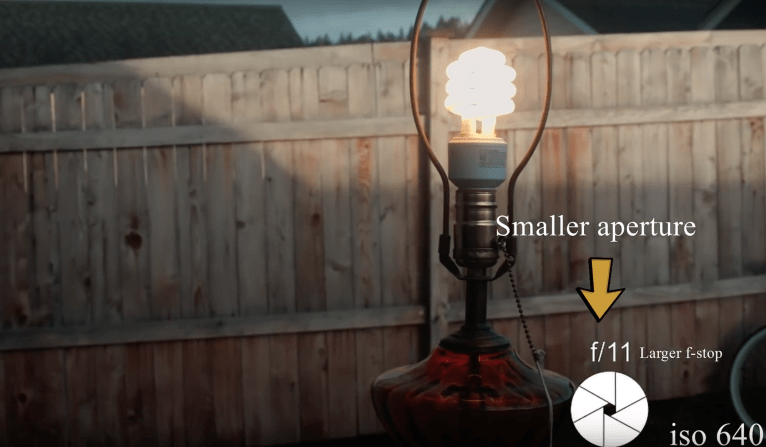
A smaller aperture creates a deeper depth of field more of the image is in focus.

ND filters a good way to help to keep a blurry background at wider aperture in brighter weather.
White Balance

White balance determines the warmth or coldness of the footage to change the white balance so it’s correct is to select a setting that matches the scene, for example if the scene has tungsten lights choose that setting on the camera. You can use auto white balance (AWB) but it may not be as accurate especially when using multiple light sources.
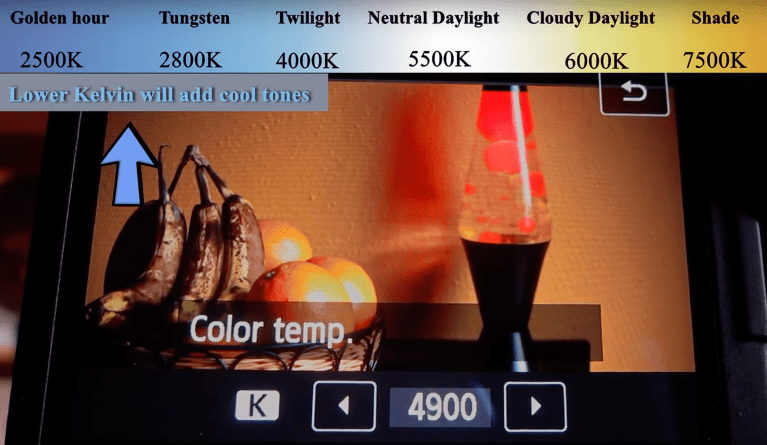
The kelvin has to be adjusted the lower the kelvin the colder the footage the higher the warmer.
Exposure
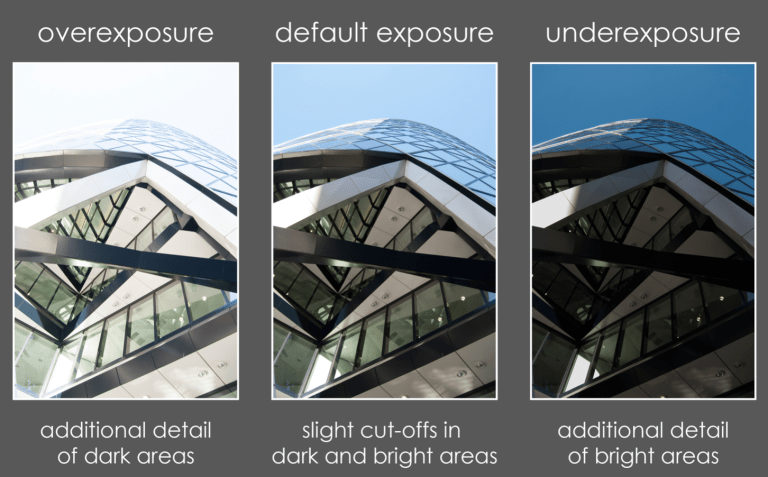
The camera I’ll be using to film is a DSLR the average DLSR has 10 – 12 stops of Dynamic Range. Dynamic Range is how much the sensor captures information of the lightest and darkest ares of footage. Proper exposing the footage means that the colour grading will be better.
Pre-Production
Recce
Production Name: Visuals Music Video
Members of production present:
Charlie Guy-Wilson 07946603961
……………………………………………………..mob…………………………………………..
Louis Keeling 07462770333 ……………………………………………………..mob…………………………………………..
Olly Wilson 07939571695 ……………………………………………………..mob…………………………………………..
Sandra Jones 07791 168937
……………………………………………………..mob…………………………………………..
| Recce Number: 1 | Location: Street |
| Access to location:
(how do you get to the location you are filming? Can you get there easily?) |
The location of the first scene is a rather empty street that near my house, this location is very accessible for me and my actors. |
| Power. Does the location have access to power? | As the location is just a street there is no power however I wont require any power as the lights I’ll be using are battery powered. |
| Noise. Is the location too noisy? | This location is very noisy because it is a road and the fact that it is close to the centre of town where a lot of cars go past. |
| Are you allowed to film there? Do you need permission? | We are allowed to film in the location as it is a public road, so we won’t need any permission to film there. |
| Is it suitable for the shoot? | The location is suitable for a shoot when comparing it to the storyboard it fits the depiction really well, however there are a lack of lights so I need my own. |
| Inside or outside?
Will the weather affect the shoot? |
The location is outside so the weather may affect the shoot but the weather forecast is clear for the days I want to shoot. |
| Recce Number: 2 | Location: My House |
| Access to location:
(how do you get to the location you are filming? Can you get there easily?) |
The second location of the music video is my house as I can use the layout of the house to create different transitions and ideas that work with the themes of the video, this location is easily accessible by everyone that is acting in the scene in this location. |
| Power. Does the location have access to power? | Yes this location has power though I don’t think I’ll need to use it. |
| Noise. Is the location too noisy? | This location is very noise proof though even if it did I wouldn’t matter as I’m just using the music as the sounds. |
| Are you allowed to film there? Do you need permission? | I am allowed to film in this location, I will need permission from the owner as it is a private property but I have the permission from the owner to film. |
| Is it suitable for the shoot? | The location is suitable for a shoot as I can using the lighting to create depressing feel. |
| Inside or outside?
Will the weather affect the shoot? |
This location is inside so the weather wont be an issue when filming and will have no affect on the quality of the shoot. |
| Recce Number: 3 | Location: Louis’s House |
| Access to location:
(how do you get to the location you are filming? Can you get there easily?) |
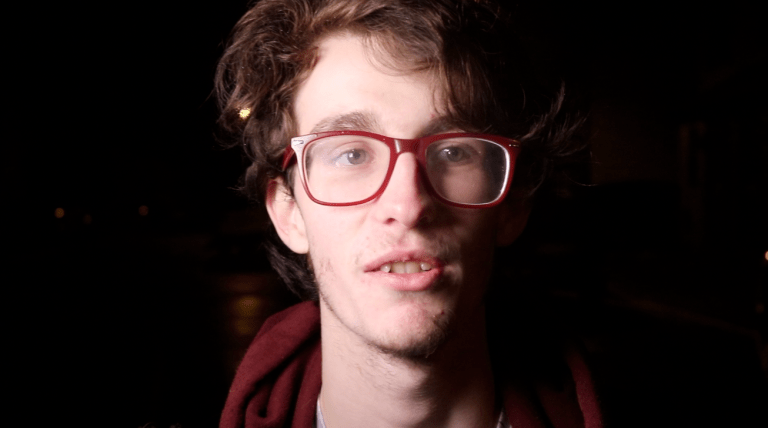
The third location of the music video is of one of my actor as the natural lighting of the house is very dark this could create different feelings and vibes to help tell the story it work with the themes of the video, this location is easily accessible by everyone that is acting in the scene in this location. |
| Power. Does the location have access to power? | Yes this location has power though I don’t think I’ll need to use it. |
| Noise. Is the location too noisy? | This location is noise proof though even if it did I wouldn’t matter as I’m just using the music as the sounds. |
| Are you allowed to film there? Do you need permission? | I am allowed to film in this location, I will need permission from the owner as it is a private property but I have the permission from the owner to film. |
| Is it suitable for the shoot? | The location is suitable for a shoot as I can using the lighting to create depressing feel. |
| Inside or outside?
Will the weather affect the shoot? |
This location is inside so the weather wont be an issue when filming and will have no affect on the quality of the shoot. |
| Recce Number: 4 | Location: Chudleigh Graveyard |
| Access to location:
(how do you get to the location you are filming? Can you get there easily?) |
For the fourth setting is a graveyard for this scene there is only one actor that needs to be in this location and he lives near it therefore the location is easily accessible be walking to it. |
| Power. Does the location have access to power? | No this location has power though I wont’t need to use any power as I’ll be using natural light to set the scene instead of any alternatives. |
| Noise. Is the location too noisy? | This location is very noisy as it is next to the main road that runs through the town meaning that there are constant cars passing by but this isn’t a problem as there will only be music in these scenes. |
| Are you allowed to film there? Do you need permission? | I wont need any permission to film in this location as there wont be any sound in this scene just music. |
| Is it suitable for the shoot? | The location is suitable for a shoot as I can use the surroundings to set the scene better. |
| Inside or outside?
Will the weather affect the shoot? |
This location is outside the weather is a problem as last time I filmed a test shot at and it was raining heavily ruining the shots. |
Risk Assessment
| Section 1 |
| Course | UAL Media / Film Studies |
| Unit or Project | Visuals |
| Name of Project | Music Video – Merkukles Jocelyn Flores |
| Date of period this risk assessment covers | Monday, 14 January 2019 |
| Producer name | Name: Charlie Guy-Wilson Tel: 07946603961 |
| Section 2 |
| Tick the hazards identified and refer to the industry standard rules and guidelines (these can be found on the BBC website)
If you are filming a high risk activity (those marked with a *) please refer to subject teacher and college policy on safety and approved contractors. |
| Hazards | Hazards | Hazards | |||
| Aircraft * | X | Hire of lighting equipment | √ | Electricity or gas* | X |
| Armourers * | X | Scaffolds * | X | Fire/ flammable material* | X |
| Costume make up vehicle | X | Smoke effects | X | Fight sequence | X |
| Driving operations | √ | Stunts * | X | Glass * | X |
| Explosive PT fireworks * | X | Access/ egress | X | Hazardous substance * | X |
| Hydraulic hoists * | X | Audience public | √ | Heat/ Cold | √ |
| Lasers | X | Comms Failure | X | Inexperienced performers | √ |
| Location catering | X | Confined spaces | X | Lifting | X |
| Machinery | X | Manual Handling | √ | Excavations/caves * | X |
| Noise * | X | Person with special needs | X | Physical exertion | X |
| Water * | X | Weather | √ | Working at heights * | X |
| Speed * | √ | Vehicles/ off road driving * | X | Violence public disorder * | X |
| Location lighting * | √ | Derelict building/ structure * | X | Lone working | √ |
| Section 3 |
| List of experts engaged: N/A |
| Section 4 |
| Details of activity: Cars will be driving towards actors at moderate speed, Filming in view of pedestrians, Weather conditions may change, Cold weather, Inexperienced performers. |
| Section 5 |
| Hazards Identified in section 2
Provide details of hazard identified in section 2. |
Risk assessment and proposed precaution.
What will you do to minimise the risk of the hazard that is identified, from happening. |
|
Driving Operator / Speed
Hire of Lighting Equipment
Public
Manual Handling
The weather will be cold
Lone Working |
The driver will have to stay within the speed limit and focus on the road instead of cameras The lighting equipment has to be handled with care and protected on shoot The Public will have a view of some of the scenes this shouldn’t be a massive problem as we can just stop filming if anyone is in the area I will be carrying all of my equipment around by hand though with proper care and correct handling nothing sound be damaged The cold weather may interfere with the quality of acting but my actors can just wear warmer clothing as it won’t effect the scene I will be working by myself on this project meaning I have to carry, setup and look after all the equipment on my own |
Storyboard


Production
Lighting
Lighting is much more than just bright and dark, it’s what can change footage from bad to great and is a key factor to shoot cinematic shots. It sets the mood and reflects the genre of a video, it allows viewers to have an deeper understanding of how to feel emotionally. For visuals I wanted to film the most cinematic footage and mainly focus on the lighting to emphasise facial features to create a more immersive feeling of emotion in the footage. I also wanted to use it to create a more professional looking image by adding depth as some of my previous projects have been quite flat looking and amateur.
I did a lot of research into the different techniques of lighting and when they could be correctly used in my music video. I found this video by Parker Walbeck to be the most useful as it briefly describes the different types of lighting and when to use them.
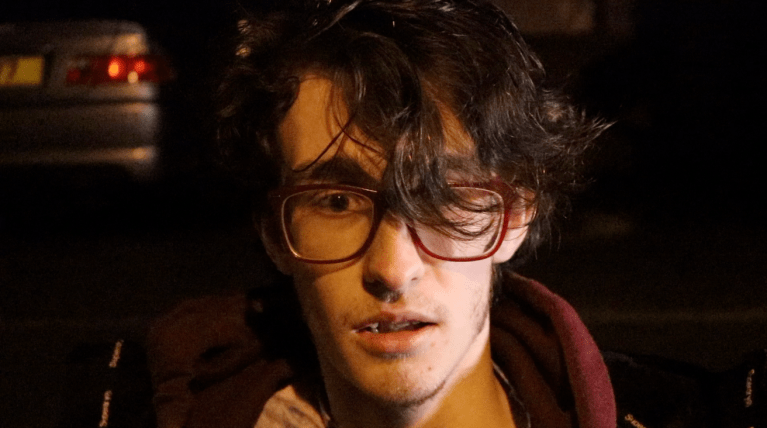
Drop Shadow
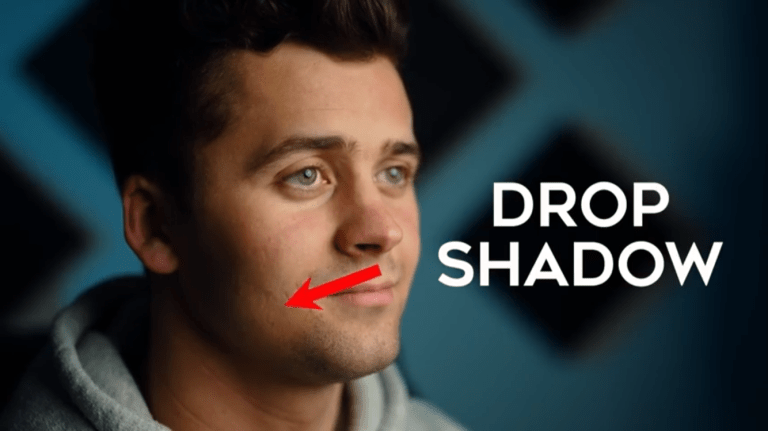
Drop shadow lighting is where the light creates a dark shadow in an area where light from a light source is blocked by the actor. The shadow takes up all the space behind an object or actor with light in front of it. It’s a low-key lighting technique and is an effect that uses the light source to enhance shadows in the scene, I used this lighting technique in some of my close-ups.

This is my attempt to create drop shadow in this close up. With this type of low-key lighting it’s about shadows and contrast I thought I could use it to make the shot more cinematic and adding depth, it also shows the mood of the shot by using the darker tones and colours.
Paramount Lighting
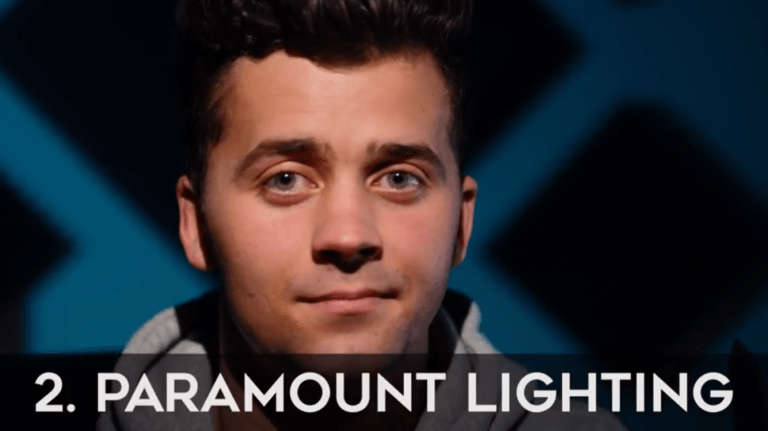
Paramount lighting sometimes called butterfly lighting is a traditionally female lighting pattern that creates a symmetrical, butterfly looking shadow beneath the actor’s nose. It tends to emphasise high cheekbones and good skin.

This image is a really good example of perfect paramount lighting as you can see all the highlighted facial features making it a more flattering.
In my music video I wanted to use this lighting technique on a close up of one of my actors as they walked along the street, to make a flattering and perfect image at the start of the video. I wanted to use this technique at start of the video when everything is supposed to be perfect. The only problem when filming this shot was that my lighting handler was the same height as the subject making it hard to keep the light in the correct position. Another problem that I had when filming was that because the actor was walking forward the shadows on her face changed slightly almost becoming loop lighting. As shown in the screenshot we were just able to keep the shadows in the right place.
Loop Lighting
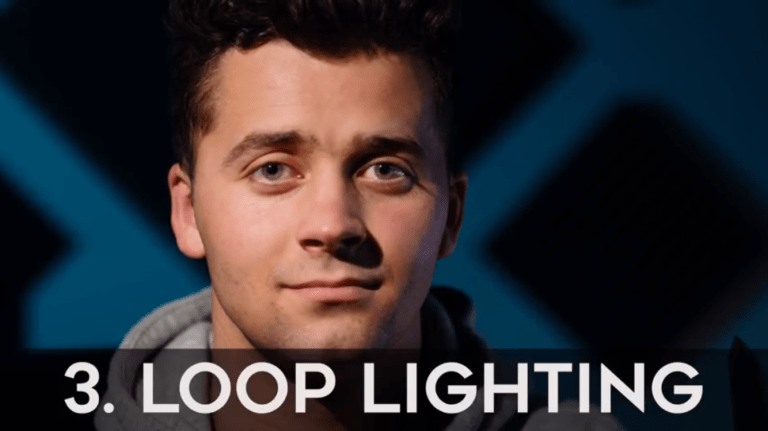
Loop lighting is a portrait lighting pattern where the actor is lit from roughly 45 degrees in front of them and above. This creates a nose shadow that loops down at an angle onto the subjects cheek.
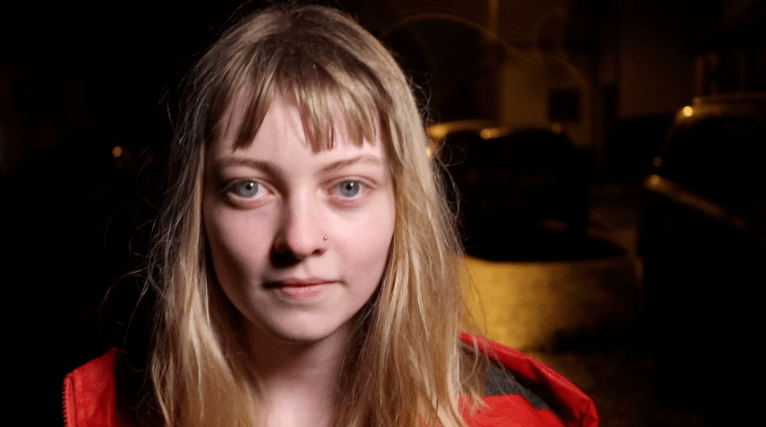
Loop lighting is usually used in photography however I thought it created a lighted hearted feel for the beginning of my music video. I wanted the lighted feeling for the start when everything is supposed to be happy and warm.
Rembrandt Lighting
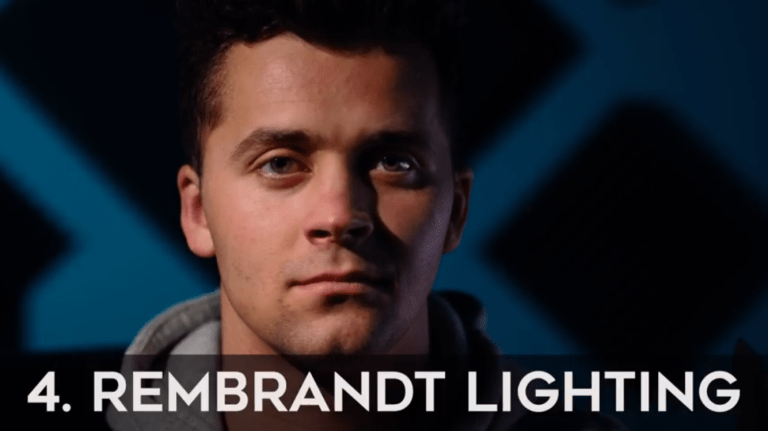
Rembrandt lighting is a lighting technique that is used mainly studio portrait photography however can be used in film as well some feature films such as Pirates of the Caribbean and Iron Man often use this lighting technique. It can be created by using one light and a reflector, or two lights, and is popular because it is capable of making natural and pleasing images with not much equipment.


Rembrandt lighting is so commonly used in feature films because it adds depth to the face making for a very dramatic and cinematic look.
I used this shot with Rembrandt lighting because thought it made a really cinematic and immersive shot the worked well with beginning themes of the music video.
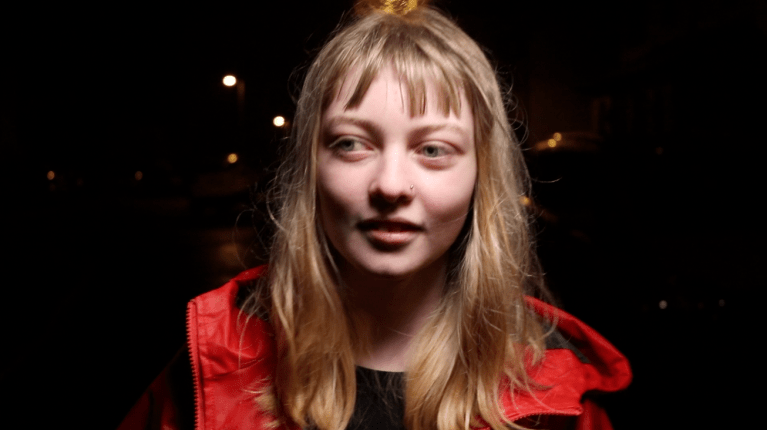
Split Lighting
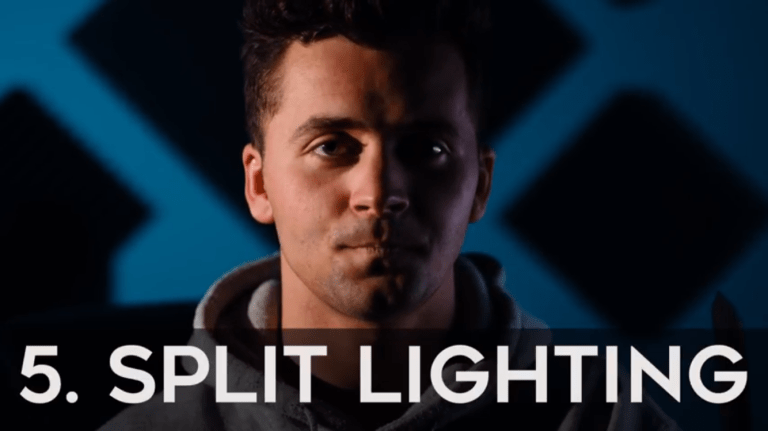
A basic split lighting setup is made with a single light source placed 90 degrees to the side of the actor and a bit higher than eye level, lighting one half of the face, and leaving the other in shadow. This technique is very when making very dramatic scenes by making the the actor look tougher.
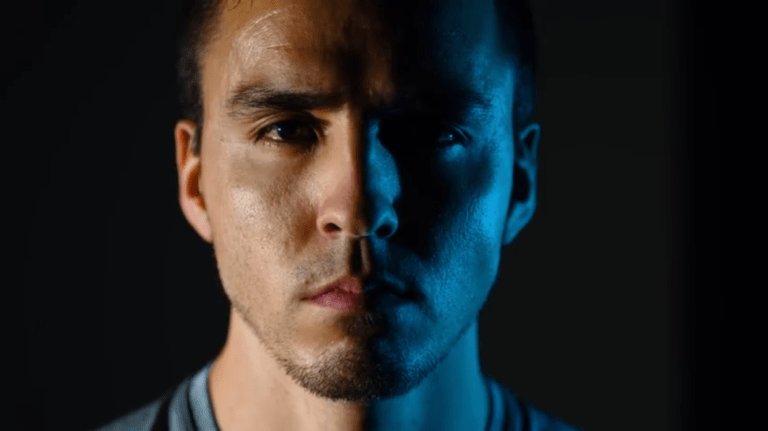
Here is a great example of a more advanced slip lighting setup by using a blacked out room and two different lights creating a more masculine look by slimming the actors face and defining facial features. This image gives off brooding and intense feel to it showing how easily lighting can change the feel of footage.
I used split lighting when the one of the actors died and I wanted to show a dramatic and intense reaction to the thematising event. I tried to mimic the previous image by replicating the blue light and close-up shot type however there was too much high key light in my footage making it less dramatic rendering the clip useless.
On Set of Production
Day 1
My plan for production was to film in order of the storyboard so I would be able to stay on top on deadlines and know exactly how much I needed to film.
On the first night of production I had to film enough footage to create a convincing car crash without actually showing a car crash, to pull this off I used fast paced scenes when the car had impact but slower sense at the start to really emphasise the speed pick up of the car.
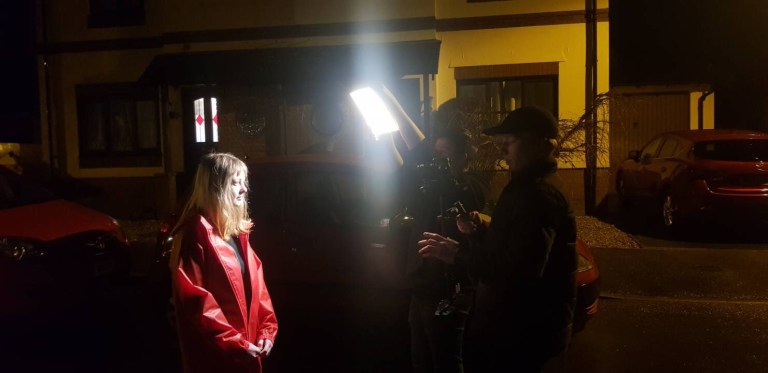
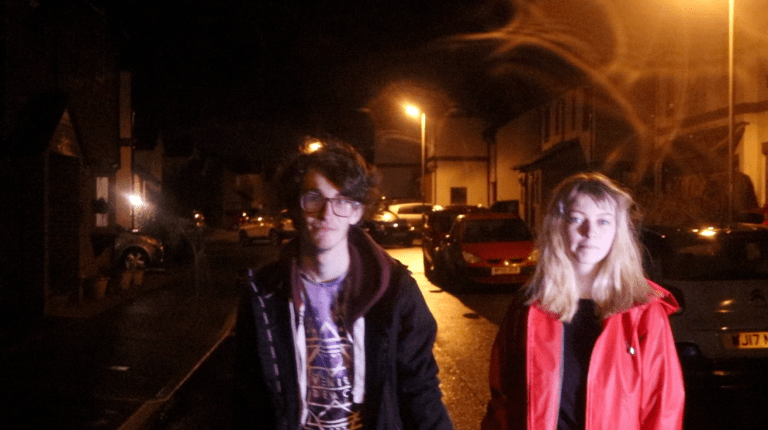
For the first shot I need a scene were a couple were walking down a road happily. I got this shot by using my stabiliser and walking backwards with my lighting handler walking by my side so I wouldn’t cause any shadows and both actors would be well light.
For the second scenes I wouldn’t to have closeups of both actors walking as this is were I wanted to make good use of the lighting and create the cinematic effect. Filming these shots were a little more challenging as I had to show my lighting handler where to hold the lights to create the right shadows patterns on the actors faces, then start moving whilst keeping the light in the same place to avoid any unwanted dark areas.
For the third I needed to film the impact of the car crash. To do this I had my actors walk down the road slowly as the lighting handler and I stood further behind them. We then run up to them focus the light and cam on one of the actors faces as they turned around creating. the illusion of a first person view of the car.
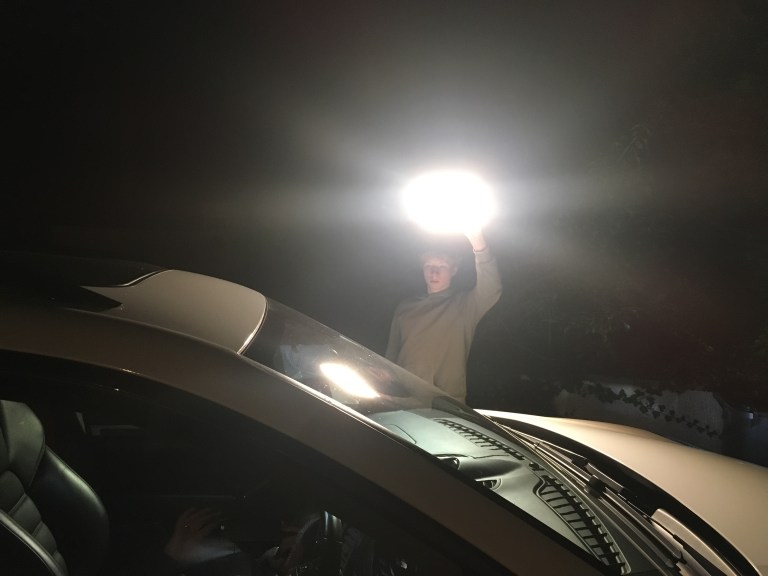
For the fourth scene I wanted two have act who turned around push her partner out the way of the car sacrificing herself. To do this I had the light placed directly behind the actors turned up to the highest brightness silhouetting the actors and creating a lens flare on the camera, this made the scene look as if the cars head lights were blinding.
For the final scene I wanted to have a extreme close up shot of one of the actors to show his feeling after watching his partner die in front of him. To create this I used one of the LED lights to shine on the actors face creating split lighting making it more dramatic, then had my lighting handler run past behind the camera to replicate car head lights driving past.
Problems
When starting out the shoot we had tried out three different roads however all them were too busy, by the time the actors were ready and lighting was set up a car would come we would have two move everything forcing me to go down a narrow side road in the village.
Once we found a suitable location for the road scenes the weather turned and it began to rain lightly at first so I was able to capture some shots in the rain, however it got heavier so we had to take an hour break from filming before the rain stopped. Although this did give the actors and I some time to review the footage and see if we needed to change anything.
As well as that we had to deal with constant interruptions from public pedestrians, as the village I filmed in is extremely quiet we had an audience build up around as at one point. I had to explain that. it was for a college project and nothing that would be seen on TV, this prolonged the time it took to complete the shoot. As well as people asking us questions about the filming we had some people walk into the shot whilst filming and flash the camera ruining that take.
Day 2
On Day 2 of the production I had to film all of the scenes that had the second main actor. My plan was to use the blue tinted light to create a depressing feel to the footage. I wanted to have a mixture of slower more cinematic shots and then fast paced shot to increase the tempo of the scenes.
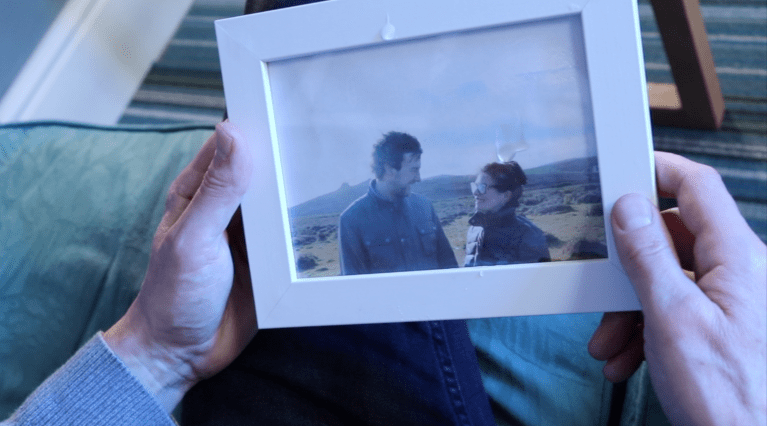
For the first scene I had the actor hold up a picture of him and his partner, we then used eye drops to make it look like the actor was crying and make for a more realistic performance. I then moved the camera around him slowly to add the feeling of movement.
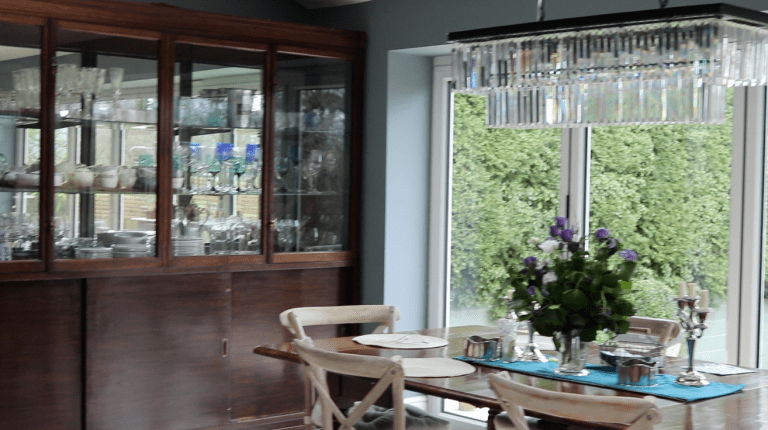
For the second scene I wanted the picture the actor was holding to fade into his actual memory of the event, so had to film a scene on the moor with both actors and then take a screenshot from the footage to print out and put in the frame to make for a convincing flash back.
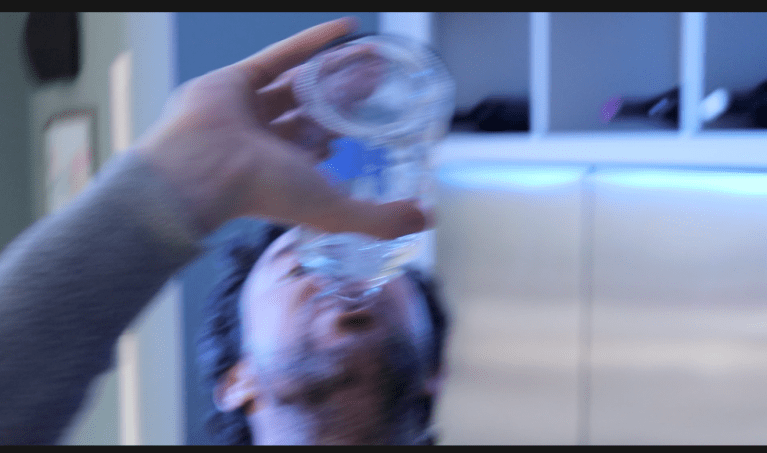
For the third scene I wanted to try and get a feeling of distress and panic for the shot where the actor frantically searches for Voka. To do this I moved the camera around deliberately so make the viewer feel uneasy. As well as that at the end of the scene when the actor was drinking the vodka I swayed the camera around to show the effects of the alcohol. For the lighting of this scene I used the blue tinted LED pack to light background with the depressing colour to add to the mood of the scene but also adding depth.
For the fourth scene I had my actor pretend to take some drugs to show how he was feeling. I filmed him doing this action of taking the drugs from many different angles as I wanted have a lot of fast cuts in is scene and make it seem like the actor had been constantly taking drugs. I used a drop shadow light on the actor as I wanted add a lot of depth to the scene and make it seem like the actor was disconnected from reality.
For the fifth scene I wanted to transition out of the scene by flicking up to the sky and cutting to sky of a different shot. To do this I needed to time this right so I counted down to my actor to tilt his head back and as I tilted the camera up at the same time.
Problems
On this shoot I only had one problem as I had planned this shoot out very carefully so I could film as quickly as possible with the highest quality.
The only problem I had on this scene was the time period in which I had to film these scenes as my actor was only available for one day meaning if I had made a mistake during production I wouldn’t have been able to reshoot. This problem was unavoidable and there was nothing I could do to change it so I just had to plan around it.
Day 3
On day 3 of production I had to film the car scenes at the beginning of the video, these scenes may have been short but they ended up beginning quite challenging to pull off properly.
The first scene was a shoot inside the car as it was stationery with both actors in it. Though the car wasn’t moving I wanted to create the illusion that that the car was in motion. To do this I left my camera on the dashboard of the car whilst I stood outside moving the the LED light around in circles, this made it look like lights were passing above it.
For the second scene I needed to film one of my actors dying in the car. To do this I got my actor to act as if the car had braked suddenly and she was slammed forward, I then stood outside the car with the window rolled down to I could get the best angle. For the lighting of this scene I left the light on the windscreen pointing down so it didn’t create to much light but enough to light the actors.
For the third scene I had to film the car speeding down a road passing the camera, for this shoot I stood to the side of the road with my steady cam as my actors drove past.
Problems
The first problem I had when filming these scenes was that the LED was too white to make a convincing street lamp so I put on the orange filter but that still wasn’t enough so to fix this problem I got an old piece of orange sheet in the attic and put the light up against it to make for a good filter.
The second problem was that when I was trying to film the car driving down the street I kept having pedestrians walking into the shot and cars driving past at the same time. The way I solved this was by taking multiple and just waiting for the right time to shoot.
Day 4
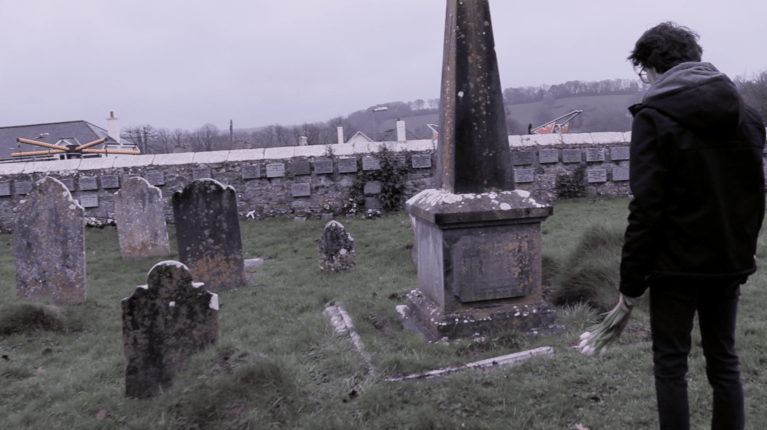
On the fourth day of production I wanted to shoot all of the graveyard scenes, I chose this day in particular because the weather forecast was for heavy cloud which would provide great mood setting as well as natural lighting.
For the first scene I used my steady cam and had my actor stand in different positions as I panned around him with the camera. I had to film this a couple of times as the movement was quite difficult and the ground was very unstable making it hard to move.
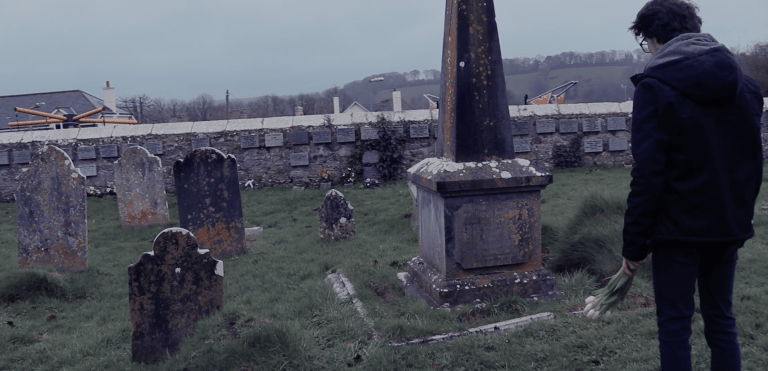
For the second scene I had the actor place flowers on the grave and then walk away from it looking heart broken. My actor performed this part of the music video really well, this scene was rather easy as the camera movements where very simple.
For the third scenes I filmed the actor walking out if the graveyard from different angles. First I followed him with the camera the ready cam making the shots look a lot smoother then free hand. For the second I was in front of the actor filming him as I walked backwards. And the third was him walking out of the gate.
Problems
The first problem was that my time with the LED lighting pack had run out so didn’t have a lights to create shadows of moods on the actor, forcing me to use natural light which doesn’t look as good. If I were to film this again I would have planned ahead better so I would have the lights during all of the scenes.
The second problem was the uneasy ground which made filming hard. One way to fix this problem is to would be to film lots of footage and watch my footing. If I were to do this shoot again I would have chosen a better location.
Another problem was that it stated to rain heavily forcing me to stop filming for a duration of time which prolonged the time it took to shoot and almost damaging the equipment.
The last problem I had was that someone from the public tried to steal my actors bag as we were filming and not paying attention. the only way to solve this would be to pay more attention to are belongings next time.
Post Production
Intro
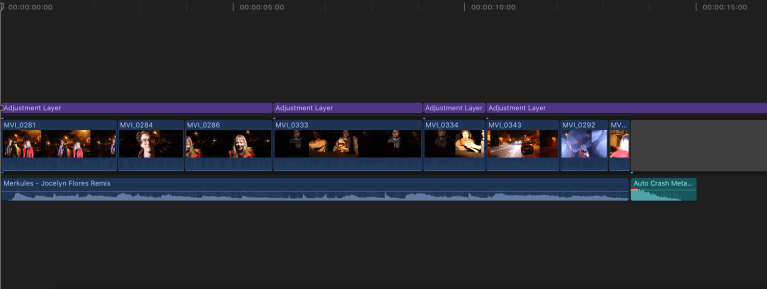
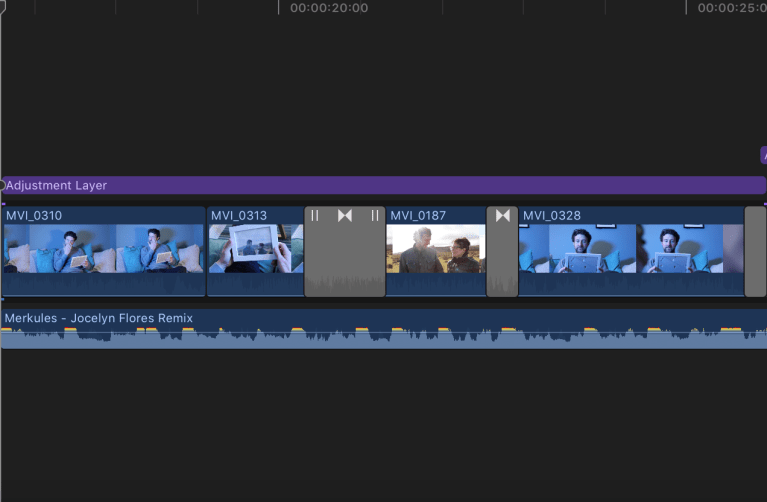
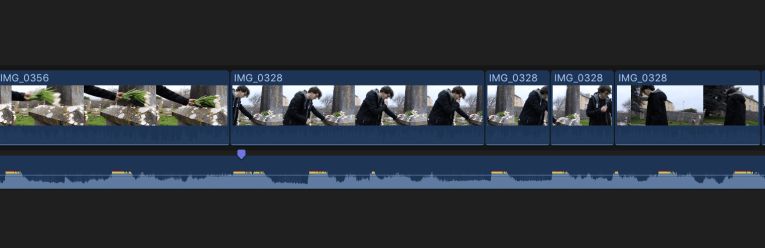
I wanted the intro it my music video to be very quick so it wouldn’t lose any suspense when the car crash happened. Although I wanted the intro to be quick I wanted it make sense and pull off a cinematic effect. To do this successfully I needed to tell the story by using shorter clips as I needed to fit the beginning in to just thirteen seconds. I didn’t use a letterbox on the intro because I wanted a more causal feel to the opening.
I started off by playing the slower clips of the actors walking through the street enjoying themselves and the clips of the actors in the car minding there own business, but the then as soon as the driver gets distracted the clips speed up with the lights rushing towards the street actors and then cut to black with the sound effect playing.
These set of clips didn’t require much editing as there was no beat so the clips didn’t have to follow it, the only thing that need to be change was the colour grading, exposure and noise reduction. For the colour grading I increased the orange tint of the street lamps so they would match the ones shinning through theca window to keep the continuity of the music video. After that I moved onto the exposure of the car crash scenes when the light is moved towards the street actors, as there was no car there just someone holding a light I increased the levels of white in the clips so the lens flare covered the lighting handler completely making the scene look convincing.
The only problem I had whilst editing this section of the music video was that a large majority of the footage had very high noise giving it an amateur look to the beginning. To solve this I added to noise reduction effect onto the clips and changed the amount to maximum and the sharpness down very low, this removed a lot of the noise but it had a lot in it. As there is no way of solving this problem completely in Final Cut next time a film a scene at night I’ll use more lighting or alternatively film during the day and colour grade to make the scene to appear as if its was shot at night.
Flashback
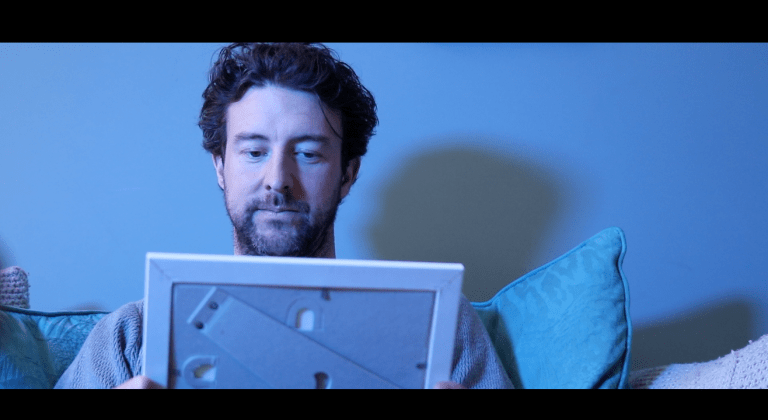
I went for a bit of a slower pace to the flashback section of the video as I wanted to reflect the sadness of the actor. I adde a letterbox to the rest of the footage to make it feel more cinematic.
The section starts with a clip of the actor holding a photo of him and his partner, then cuts to him crying onto the photo but as his tears hit the picture it fades into the memory of them having fun and enjoying them selves on a sunny day. The scene then pulls out of the memory and back to the actor sat and the sofa transitioning out of the scene by sliding left to black.
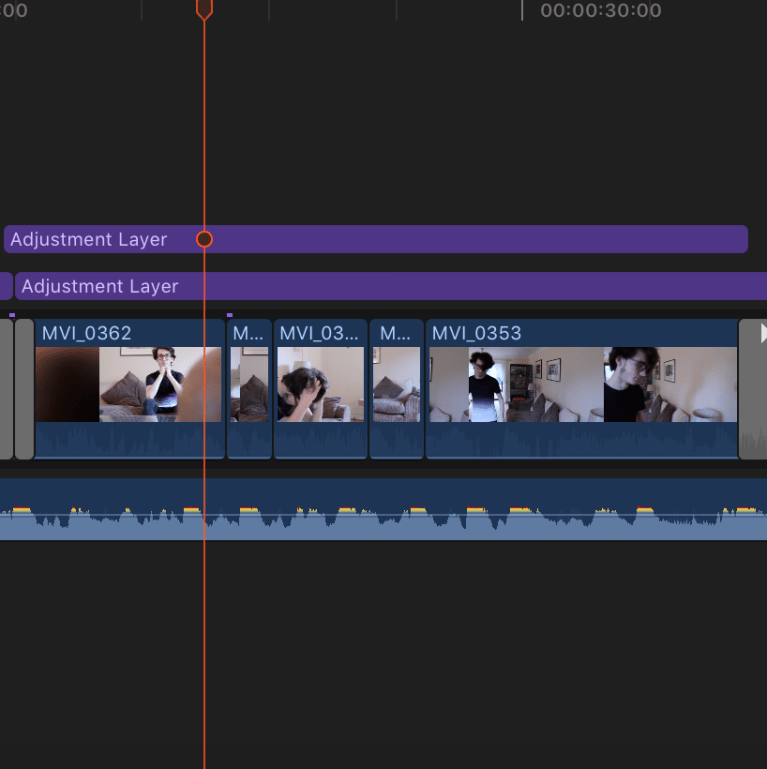
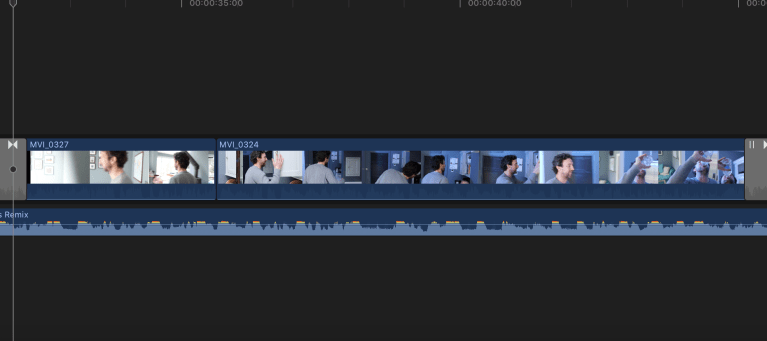
Because there was a beat to this section it required be to cut to it making the video flow better and smoother. So my first job was to put the clips in order and adjust the length of the them so they would cut to beat.

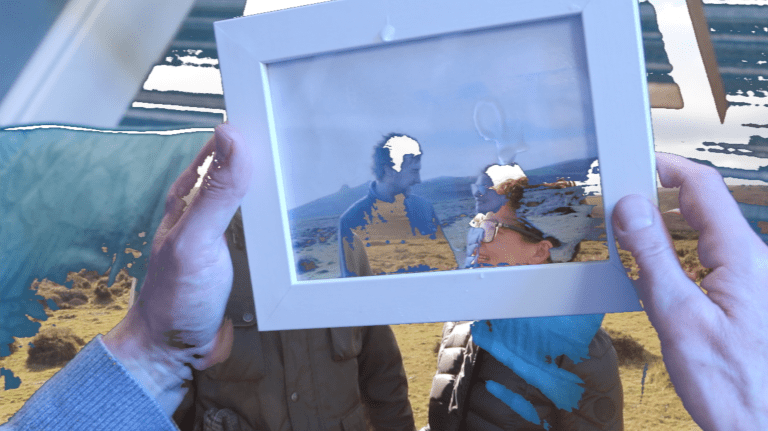
Second I added in the transitions, for the ‘fade into memory’ scene I used a luma fade plugin that that started out by fading the darker tone and moving on to fade the lighter tones after. Once I added the transition and adjust the length to cut to the beat I realised the edges of the faded were a bit to sharp for the look I wanted for this section, to fix this I increased the 3D luma fade which stretched out the RGB colours on the edges of the transition. I then played around with the softness and erode settings to make the transition as smooth as possible.
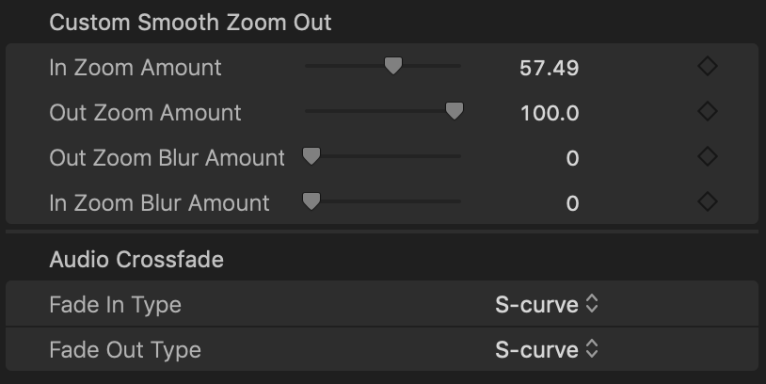
I then added a zoom out plugin to pull the viewer out of the memory and back into reality. I changed the duration of this transition to make it shorter because I wanted it to feel jolting as if you had been whipped back to reality. The only problem with this was that it made the transition feel robotic and out of place so fix this I added to slightly increased the zoom amount and added some motion blur so make the movement seem more realistic.
After I was happy with the luma fade and zoom out I moved on to transitioning out of the scene when the camera slid behind a plant pot. I thought this cut wouldn’t need any editing and I could play the clip that slides out of black into a new scene, however this looked jumpy and was clearly noticeable which was not what I wanted. So to solve this I added a crossfade into black and then another crossfade out of black into the new scene this created a seamless cut between shots.
Once all the transitions had be complete I moved on to the colour correction and grading. I started off with the sofa scene with the blue tint. I wanted to create a sad and depressing feeling so I decreased the saturation and increased the blue in the scenes and then decreasing the light exposure giving off a darker vibe to footage. I was going to change the flashback it’s by adding a warm LUT to it, however I felt it looked better as natural as the sun creates a nice lens flare adding a warmer feeling so I left it as it is.
Character Breakdown

This scene may have been short however I wanted to make it as fast paced and disorienting as possible to show the mental state of the actor making it more time consuming.
The scene starts with the camera sliding out of black and then cutting around the room fading into the door frame.
First off I arranged the clips to fit with disorientating feel by cutting short clips to the fast beat of the song to different locations around the room. This took longer than I thought as I had zoom into the sound pattern of the song to be able to blade exactly as the beat played.
After that I had to add a cross fade into black as the moved into the doorframe as the actor walked out the door.
I encountered quite a lot of problems whilst trying to colour grade this scene as the room had yellow wallpaper therefore breaking the theme the blue coldness I had in the other shots. Changing the yellow to blue was difficult because every time I made the blue obvious the footage looked over edited and amateur. So overcome this I had to darken all of the clips by decreasing the saturation and lowering the light exposure then changing the master colour board to a slight hint of darker blue. Overall I am quite pleased with the colour grade of this section as I think it fits well with the mood.
Vodka Drinking
For this scene I wanted to show a series of shots were actor frantically searches for a bottle of Vodka to put his guilt out of his mind, although I ended up filming this scene in one long shot. I wanted to this scene to be in time with music as much as possible so it wouldn’t become boring for the viewer.
The scene starts with the actor walking out of the door with the camera fading out of black from the doorframe, then cutting to one long take of the actor searching the cupboards for his Vodka. Once he finds it he starts to down it as the camera sways around him showing the effects of the alcohol then using a rotation to transition out of the scene.
Once I had dropped the clips I wanted on to the timeline and adjust them to the length I wanted, I added to crossfade out of black and into the doorframe. I then added the clockwise transition at the end of the clip shorting it and adding a lot of motion blur to emphasise the effect of the alcohol.
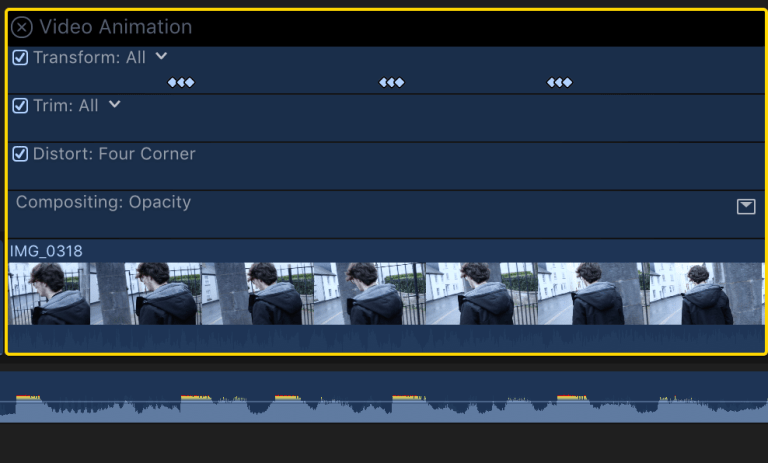
After watching this clip back I realised how slow and uninteresting it was, this was a big problem for me as I had idea how to change it up, but then I thought about adding a pulsation effect to clip as it had a fast beat over it so I watched this video on how to do it.
In this tutorial it shows you how to make your video zoom in and zoom out with a beat drop and really helped me understand how to make the effect happen with video animation setting and key-framing.
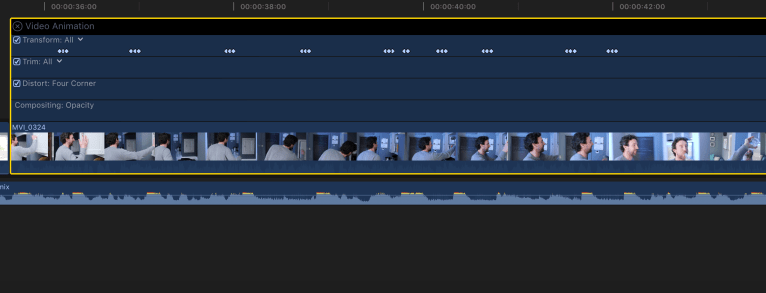
I started off by control clicking on the clip and opening video animation then going to transform. After that I placed a key frame on all of the sub bass and high hats drops then placing a key frame on either side of the original key frame making a line of three key frames very close together. For every sub bass drop I changed the middle key frame to increase the overall scale of the clip to 105% then drop it back down to 100%, but for every high hit drop I increased the scale of the clip to 115% as it was a more defined sound.
The only problem I had whilst editing this that there were two sub bass drops very close together, meaning I had to overlap a keyframe which I thought would ruin the effect however it made a really interesting pulsing effect which looked like a heart beat.
Pill Taking

I wanted this this scene scene to start off slower but the come into a fast paced cut to the beat style to, to show that the character is taking in what he’s about to do.
The scene starts by coming off from the rotation from the previous scene to see the actor sitting on the sofa holding pills, he takes the pills and and the camera pans the room to show the effect of the drugs. The actor then tilts his head back passing out from the drugs the camera flicks up to the ceiling crossfading into the next scene.
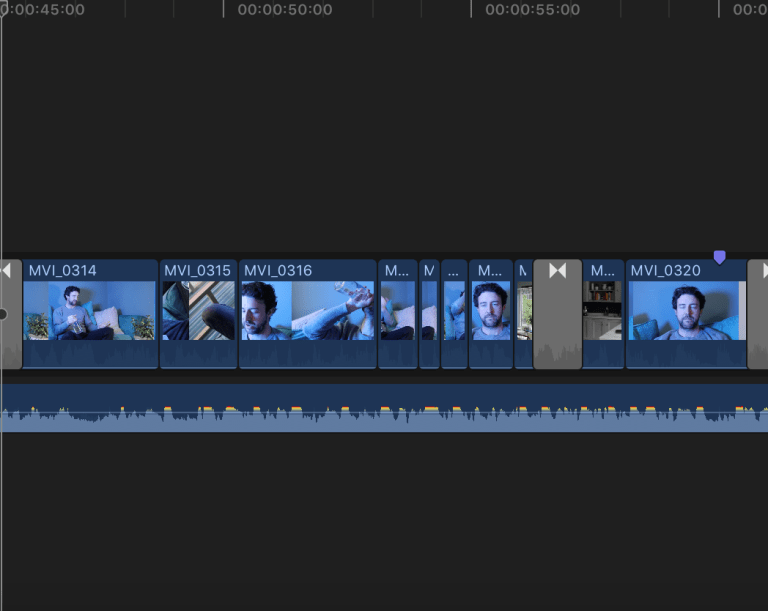
After arranging my clips to show the actor talking the pills once from different angles, I cut to beat of the music replaying the shots were the pills enter his mouth but shorter and quicker. I did this to show that the actor has actually been taking multiple amounts of pills. This was an easy task as I knew exactly what clips I wanted to play and how long then I had zoom in to see the sub bass patterns and match up the start and end of the clips.
Next I went on to work on the drug effect for shoot I wanted to have a first person view of the drugged character showing the effects they were having.
Before
Effect

After
To do this effect I used the clip of a pan of the room and then bladed the middle of the clip and inserted the SRG Smooth Stretch transition, which temporarily stretches the footage showing the separated RGB colours in the shot. I then colour graded the second half of the room pan to look like a stereotypical psychedelic vision so viewers would know what was happening immediately. To get right colour grade and correction I increased the saturation and exposure whilst using the colour broad to change the shadows and highlights into neon colours.
Graveyard
In this last scene I wanted to use all the techniques I had thought video to make these clips seem fast paced and interesting butt also to show the characters emotions and connect to audience.
The scene starts off by flicking down from the sky then jump cutting around the actor holding flowers, the the actor places his hand on the grave to show respects then cuts to the beat as he walks away. Then actor walks out the graveyard going in slow-motion to match a slow section of the song. As the actor walks out the gate the image pulsates along with the beat.
The first thing I did was edit the jump cuts and cut to the beats.
To edit this I started off with one long clip of the camera panning around the actor and the used the blade tool to cut out sections of the clip and then shorten then to go in time with beat.
I used the same technique of this section as well as by cutting up a long clip and shorting it to the beat of the song. Editing these clip weren’t challenging although they were time consuming as it took a while to cut out the exact bit of footage and then perfectly shorter it to fit in with the surrounding clips.
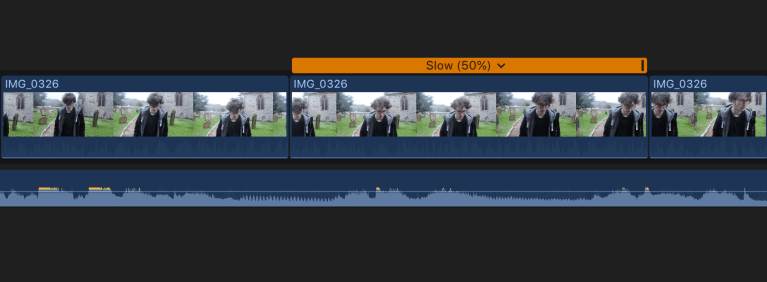
I noticed on the next part of the song there was a slow section of just singing with no beat at all so I thought that this would be a good place to use slow motion to show the change in pace and then resume it as normal when the beat comes back in.
To do this used a clip of my actor walking and then bladed out a segment when the wind blew his across his face and the decreased the speed by 50%. I used the part of the clip when the wind blew because even though it was slow motion I still wanted movement.
For last section I wanted to use the pulsing effect to liven up this clip as it was a bit slow and didn’t work with the pace of the song. I used the same technique as before by increasing the scale of the footage by different percentages based on which sound was played over the clip.
Final Edit
Evaluation
What was your original idea?
My original idea for the blog was to start by playing the intro of the song with very cheerful and happy mood and using high key lighting, this symbolism the lighted hearted feeling and the mood of the overall. I mainly added this to show the contrast between the beginning and the end of the video showing, I thought that this would create a bigger connection to the audience because it makes the emotions of characters clearer. After the intro I wanted to show the fast degrade of happiness and increasing depression, did this through the increasingly fast cuts and cut to the beat. The colour grade started off with a desaturated clips and increased blues to make the footage seem colder and with a sad feeling. However I contrasted this during the flash back by increasing the saturation and increasing the yellows and then adding my custom LUT ‘Warm California Look’ to brighten the clip, the colour grade symbolises the happiness of the couple before the car accident. The colour gets darker as the mood gets worse when one of the actors takes pills and drinks the saturation gets darker and when the second actor visits his partners grave the footage almost turns to black and white.
How has it developed?
After my first edit I realised that my draft was extremely slow and wasn’t cut to the beat at all meaning that video was extremely slow paced and boring to watch however the length of the video fit the brief. To change this I shorted a lot of the clips to cut to the beat making the video flow a lot better and enable me to tell the story of the visuals a lot clearer. After adjusting the clips to fit to the cuts and transitions I used jump a editing technique called jump cuts an abrupt transition from one scene to another, this makes for a more interesting effect and if done correctly to the beat can make for really interesting visuals. I also used an editing technique pulsing effect on to the slow and boring clips to add a bit of diversity to the music video, this effect is also used to show the effects of alcohol and pills on the characters. Unfortunately after all this editing to make the clips shorter to edit to the beat I cut out a lot of the slower shots shortening the entire video, meaning the total run time was only 1:30 minutes and the briefs states that the minimum requirement is 2 minutes. Unfortunately this means I won’t be able to enter my music video into the Los Angles Music Video Festival, however I wouldn’t change this discussion even if I did this project again and found myself with the same problem as it drastically increased the quality of my music video.
How might it appeal to the film competition?
Apart from the fact my music video isn’t long enough to qualify for the LAMVF however if that wasn’t a requirement I think my video would be appealing for the competition. I think my music video would appeal to the film competition because it explores a darker and relatable themes that could connect with an audience, I have noticed that this is a recurring factor in a large majority of the winning music videos. Another thing that I noticed is a common theme within the winning videos is that they’re all visually pleasing and interesting with clever editing, as my video has some of the factors I think it would appeal to the judges of the film competition. However it wouldn’t get very far in the competition as the footage at the beginning of the video has a high level of noise which ruins the cinematic effect, as well as that some of my clips have some shaky footage which makes the clips look amateur.
Why a music video?
I chose to film a music because as soon I was given the brief to this project I had thought of idea and song that I wanted to work with, due to this I decided to make a music video because I was convinced I could make the idea I had work. As well as that because I had an idea so early into the project I saw it as an opportunity to go really in depth and do a lot of research and greatly improve my camera and editing skills. I didn’t want to make an experimental short film as I felt it wouldn’t have been to highest quality and I thought that I could create something I would be proud of if I made a music video.
How happy are you with the final edit?
At first I wasn’t happy at all with my first couple of drafts of my final edit as I didn’t edit to the beat which meant that the clip was slow and didn’t match the pass of song. However after some editing advice from one of my lecturers and did a lot of research and was able to create a video that I was happy with. Of course I wasn’t one hundred percent happy with it as it didn’t met the requirements of the brief regarding the duration of the music video. Apart from that I wasn’t happy with the majority of the video I was happy with the colour grade, cinematography and editing because I spent so much time on changing it from slow and boring to fast paced and cut to the beat.
